Friday 22 November 2013

Modifying our cheap CNC machine

As mentioned in a previous post, our CNC 3020 milling machine came with a little room for improvement. In this post we discuss some modifications we made to make our machine more useful.

Adding limit switches

Limit switches allow the CNC mill to home itself to a repeatable zero position. They also prevent the machine from going outside its permitted range of motion and crashing into 'hard' limits.

For most CNC machines, it's common to provide two limit switches for each of the X and Y axes (for maximum and minimum limits) and a single limit switch on the Z axis for the upper limit only. The 'safe' lower Z limit depends on the kinds of materials you have clamped onto the platform and the kind of cutting bit you happen to be using at the time. It's not the sort of thing you can simply guard with a limit switch.

Limit switches are cheap to obtain online. They are simple microswitches with a lever arm and roller attached to help actuate the switch with a reasonable amount of precision. We just superglued them onto the aluminium frame of the machine in positions where they would be tripped just before the machine would hit a hard limit. With a bit of creativity, you can find positions to locate the switches that sacrifice very little of the machine's range of motion.


The X limit switches will trip if the carriage moves too far to the left or right. The Z-maximum limit switch is mounted on the carriage and will trip if the spindle rises too far up. Small dowel pieces help give the superglue more surface area to bond to.


This Y-minimum limit switch will trip if the gantry moves closer to the front of the platform.

We wired both X axis and both Y axis switches in series, using the 'Normally Closed' connectors on the switches. This is the recommended option as faults in the limit switch connections show up immediately. We made the connections using light-duty stranded-core bell wire. We'll have to wait and see how durable this wire is in the long run, but it's very flexible and thin enough to fit into the existing cable trunking fairly easily.

For the other end of the connections, we were lucky. Although the CNC 3020 controller box doesn't provide any inputs for limit switches, there are holes on the circuit board inside where you can solder on a pin-header for X, Y and Z limits. What's more, after we soldered on a 6-pin header, we found these pins to be fully functional. They simply map onto three otherwise-unused parallel port inputs pins.


The PCB from the controller box after soldering a strip of 6 header pins into a bank of 6 vacant holes labelled 'LIMIT'. Presumably, a more expensive model would have come with those header pins already there to begin with.

We drilled holes in the back of the controller box and ran the limit pins to female banana connectors. We chose banana connectors because they're versatile: you can use them as binding posts for bare wire, or you can terminate the wires properly by adding banana plugs. (We also added a grounding post on the back for possible equipotential bonding to the CNC platform, which might be overkill...)


Banana socket binding posts added to the back of the controller box.


Ribbon cable linking banana sockets to LIMIT pins. (GND post not yet connected.)

Keeping dust out of the controller box

The controller box has a fan inside for circulating air around the heatsink, with an unfortunate side-effect. Milling dust is sucked into the unit from the nearby milling platform, where it collects on the circuit boards inside. This isn't a huge problem when milling wood as sawdust isn't conductive. It becomes a problem if we start milling aluminium or copper. Moving the controller box further away from the milling platform isn't an option; the cables are too short.

Our solution was a combination of filters and ducting. For the front and side vents, we cut filters out of kitchen scouring pads (the type that come in flat sheets). For the price, these make excellent dust filters. We hooked them over the air intake grilles with office staples.

For the bottom air intake (the most critical, as it pulls air across a large heatsink), there wasn't enough bottom clearance between the controller box and the bench to add a filter without severely limiting airflow, with the risk of overheating. Instead, we added sponge strips around the bottom of the controller box on three sides so that air could only enter from the left hand side – away from the milling platform. The sponges had the added bonus of lifting the controller box slightly, improving airflow to the bottom vent.

The rear vent does not need filtering as it's the exhaust vent for the fan, and should repel dust when the unit is turned on.

Wednesday 23 October 2013

Beware of Dark Patterns!

Dark patterns are increasingly-common user interface elements designed to trick unsuspecting users into selecting an undesirable option, such as installing an unwanted app or signing up to an unwanted service.

Although designers go out of their way to provide a sleek user interface for hooking you in, you may not always find an equivalent feature that lets you undo your mistake afterwards.

A typical example

The following screenshot comes from an installer stub program which the user must run in order to install video editor software downloaded from a popular website:

Most software will require you to accept a license agreement before you are allowed to install. In the above screenshot, the user will probably assume that the green 'accept' button is the only way to go forward with installation.

Reading the screen more carefully reveals that it is actually referring to a different, completely unrelated program; one that alters the user's web browser settings in order to display advertisements. In this case, the correct way to proceed with installing the video editor, without the unwanted extra software, is actually to click the greyed-out 'decline' button.

By accepted user-interface convention (as specified by Microsoft and Apple, among others), a greyed-out button denotes an invalid option that is not able to be selected by the user. Here however, the 'decline' button is a perfectly valid option even though it has been given the cosmetic appearance of a greyed-out button. It has been greyed out purely to deter the user from clicking on it, even though it is probably the preferred option for the majority of savvy users.

Why do dark patterns exist?

Organisations typically have a financial incentive to persuade users to install a particular program or buy a particular service. In the above case, an organisation would receive a commission for each user who clicks the 'accept' button. There are always incentives for a company to improve sales, and deceptive sales tactics are hardly anything new.

Why does it matter?

If you own a computer, you have the right to be in informed control over what runs on it.

Unwanted applications are a security risk. If you have sensitive data on your computer, you probably don't want to allow strange applications to install themselves and assume free-reign over your files.

Unwanted applications deprive you of full use of the computer you paid for. If you perform computationally-intensive tasks, you probably don't want to have your system's performance and reliability compromised by a poorly-coded application you didn't realise you'd installed.

Finally, in an age of email-viruses spread through a combination of shady social-engineering tactics and uninformed users, it really isn't a good look when otherwise-reputable organisations engage in the same tactics.

What to do about dark patterns

Ideally, you should never trust someone with your business, or your web traffic, if they do not treat you – or your computer – with respect.

If you stumble across a dark pattern on a website you're using (for example, a website that tries to trick you into adding unwanted items to your order, or one that doesn't tell you what the 'catch' is until you've already invested time in filling out your details), stop using that website and find an alternative.

If you find a dark pattern in an app you've downloaded, immediately delete the app from your computer. If the app is distributed by a reputable organisation, consider sending an email to the distributor to let them know what is going on.

More information

There's an excellent guide to dark patterns, along with a collection of examples, over at darkpatterns.org.

Tuesday 8 October 2013

Getting a CNC mill

We've just got hold of a cheap CNC milling machine, which ought to come in handy when building hardware prototypes.

What's a CNC mill?

Everyone's heard of 3D printers. A CNC mill is a bit like a 3D printer in reverse. Instead of building up an object by adding material in layers, a CNC mill starts out with a solid piece of material (a block of wood, aluminium, etc.), and carves away unwanted material until you're left with the finished part. The quality is higher than 3D printing. When Apple sells a high-end product that was 'carved from a single piece of aluminium', they're talking about CNC milling.

Unlike 3D printers, CNC milling machines haven't started to become 'consumerised' yet. You pretty much have to know the machine inside out in order to use it. Fortunately, they aren't particularly complicated machines, and we do appreciate the fundamental simplicity. There are two main bits to understand:

  • A spindle holds an engraving bit. It spins the engraving bit at high speed (like a drill) to carve out material.
  • The spindle can be moved around in three dimensions (X, Y, Z axes) to different co-ordinates by a program script (called G-code) running on a connected PC. When you move the move the spinning engraving bit through a path where a piece of wood happens to be, wood is carved out by the spindle (unless you go too deep too quickly, or forget to spin up the spindle first, in which case you're likely to stall the machine or break something).
    The machine has a set of three motors, one for each axis of motion. Each motor turns a long screw that moves the spindle along its respective axis.

What did we go with?

We went with a YOOCNC 3020 machine. This machine is sold on eBay under a variety of brand names (just search for CNC 3020), and is just about as cheap as you can get a new machine without building your own from scratch. By all accounts, it's a machine loved by amateurs, hated by professionals, and requires the odd few modifications to overcome the inevitable design flaws. We're new to all this, so we haven't been spoiled enough to demand anything better.

Setting up the machine

The CNC machine is controlled by a PC through the parallel port interface that many motherboards no longer include (although there are cheap PCI cards available on eBay that will add a parallel port to any motherboard). The PC must provide the correct impulses in real-time, or else the CNC machine stutters or the PC application that controls it gets out of sync with the machine's actual position. That usually means that you set aside a PC that's dedicated exclusively to CNC work and nothing else.

There's a special Ubuntu-based operating system called LinuxCNC (formerly known as EMC2), which provides software for controlling a CNC machine and uses a customised Linux kernel optimised for the real-time demands of CNC machines.

For controlling the machine, I put together a PC with a 1.5GHz Via C7-D processor, 1GB of RAM, and an old 4.3GB Quantum Bigfoot hard drive that cost around $900 in 1996. I used an older version of LinuxCNC/EMC2 because the new version is based on a more bloated version of Ubuntu). The Via C7 line of CPUs came out a few years ago as a competitor to the Intel Atom. Despite mediocre performance in many desktop and gaming applications, they provide great real-time characteristics which made them well-suited to industrial applications.

Limitations of the machine

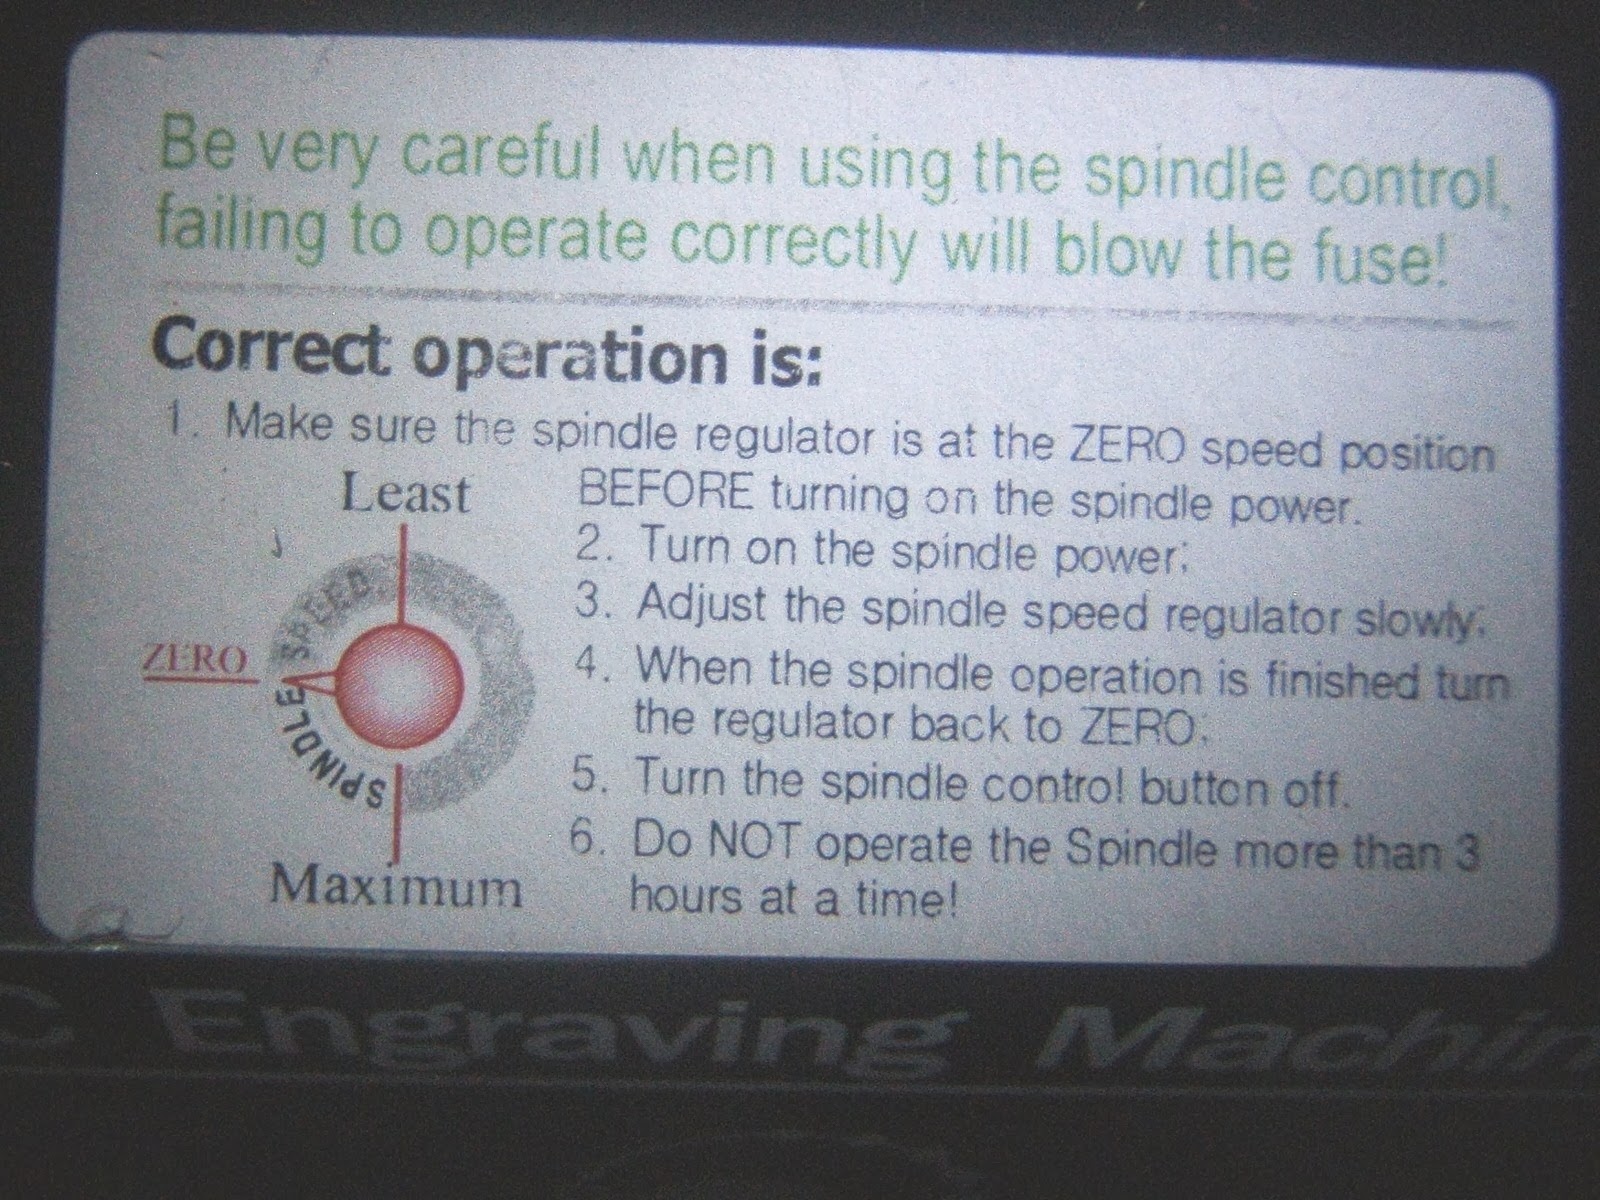
On this particular machine, the spindle control is all-manual. You have to flick a switch to turn it on, and slowly rotate a variable control to take it up to full speed. (More expensive machines allow the spindle rotation to be controlled by the computer.) The machine comes with a sticker attached warning you that you'll blow one of the internal fuses if you spin it up too fast:

The emergency stop button on the front panel is purely a software input to the PC through one of the parallel port pins, so if you have it set up correctly, it'll instruct the PC to stop moving the machine along the X, Y, Z axes, but it won't cut the power to the rotating spindle. (Looking inside the controller box though, there is an unused pin header on the power supply board for an emergency stop input for the spindle. Perhaps with a bit of work, the controller box could be modified to incorporate the spindle into the emergency stop.)

A problem we noticed fairly early on is that some engraving dust tends to get sucked into the controller box by the inbuilt cooling fan. We'll discuss this later in another blog post.

Another issue is that there are no limit switches or inputs on the controller box. What does this mean? Well, a CNC machine always knows how to move, say, 52.4mm along the X axis from its current position, but it has no way of knowing its absolute position, or how close it is to slamming into the end of its range of motion and stalling one of the motors (or, in the case of this machine, pinching the Z axis motor cable). Without limit switches, you have to zero (or 'touch-off') the spindle position relative to your work-piece each time you use it. With limit switches, the PC software can automatically home the machine to a default position each time you use it, and automatically ensure that the spindle doesn't go outside an allowed safe range of motion.

The good news is, it is possible to add limit switches to this particular machine: the PCB inside the controller box provides the capability, although there's a bit of soldering required. We'll cover this in another blog post later.

Finally, the documentation leaves a bit to be desired. Parameters are provided for a Windows program called Mach3, but EMC2 requires a few extra parameters. We found we had to start with what was given and work backwards to determine the rest.

Sunday 13 January 2013

How do you change your car's oil when you can't get the oil filter loose?

Here's something a bit different: cars. And oil changes. Cars are a ubiquitous example of the way various industries simplify their products for end users, not by making them fundamentally simpler, but by hiding complexity from the end user. Which is fine; until you have to change your oil.

You would have thought that car makers would have streamlined the oil-change process for end-users by now (where's the flap on the side of your car that lets you drain your old oil easily?). But on the contrary, the engine compartment of a new car is less accessible than that of a 27 year old car. I'm thankful that my car is 27 years old. But changing my oil for the first time still wasn't easy.

The mechanic who serviced my car last, used a rattle-gun to over-tighten everything as much as possible. Even parts like the oil filter that are only ever meant to be hand-tight. Rather than ranting about it further, I'd like to share a few tricks I came up with for getting stuck parts loose:

How to get your old oil filter loose

My oil filter wrench (the type with a metal band that tightens around the filter when you bend the handle) wasn't giving me enough grip, and at any rate, I didn't have room to swing it around far enough to make any progress. I didn't want to resort to the messy technique of hammering a screwdriver into it. Here's what I tried:

Give your filter wrench a sandpaper-surface

You can apply a coat of superglue to the inside surface of your filter wrench's metal band, then immediately sprinkle sand over the glue. When the glue dries you'll have a durable rough surface with plenty of grip (superglue isn't terribly flexible so leave gaps). Or you can simply glue strips of sandpaper to the inside of the wrench.

In my case, although the sandpaper seemed to help a bit, I still didn't have enough room to get my filter wrench tight enough around the filter.

Wedge a flat-head screwdriver between the wrench and the oil filter

Insert your flat-head screwdriver between your filter wrench's metal band and the filter. That way, when you bend the wrench handle to tighten the band, the screwdriver not only helps to take up the slack, it helps provide a concentrated point of pressure between the wrench and the band, giving you a lot of extra friction. In my case, it made all the difference, and the filter began to turn.

How to get the oil drain bolt loose on the bottom of your engine

My mechanic had put on the drain bolt on the engine sump impossibly tight. Too tight for brute force, even with a decent wrench.

  • First of all, you need a decent wrench, like a hex wrench (rather than a crescent wrench or spanner) that isn't going to slip off the bolt at every opportunity. The wrench needs to have a hole at the end of the handle.
  • You also need a ratchet tie-down strap. hook one end into the end of your wrench (or thread the strap through the hole until the hook stops it pulling through any further). Hook the other end to a solid part of your car's frame (if you can flex it by hand, it's not strong enough), so that when you tighten the ratchet, it will pull the wrench anti-clockwise.
  • Don't use an elastic strap under any circumstances. It won't withstand the tension you're about to subject it to, and when it snaps, it could do you a very serious injury.
  • Gradually tighten the ratchet. (As a precaution, just reach under the car with your arm when you do this, keeping your face and as much of your body as possible out of the way just in case something flies loose.) When the strap has enough tension, the wrench should very slowly and gradually begin to turn.


Other tips

  • If your oil filter and drain bolt are readily accessible, see how tight they are before you do your oil change. There's nothing worse than having your engine warm and everything ready to go only to realise that you can't get anything loose. If they're really tight, loosen them a quarter turn beforehand (don't worry, they'll still be tight enough to prevent any leaks).
  • Don't jack your car up if you can avoid it (it's safer not to). If you have your own driveway, chances are you have an inclined ramp between your driveway and the street. Back your car into your driveway just far enough so that your front wheels are at the highest point of the ramp, and the front end of the car is hanging over it. The slope of the ramp should give you a bit of clearance so that you won't have to jack your car up. (I picked up this trick from a professional mechanic.)
  • I like to disconnect the negative terminal of my battery, and pull out the distributor leads from my spark plugs, before I do any work on the car (as well as making sure the handbrake is on firmly!), just to be absolutely safe.  This will also prevent other people who have access to your car from unknowingly starting the car when there's no oil in it!
  • Wrap your oil drain pan in at least two layers of big plastic bags. Then wrap tape around the contours of the pan's spout so you can still pour the oil out of the pan easily. You won't have to clean the pan when you're finished.